Rules: Placing polyp tiles

[ prev | 1 2 3 4 5 6 7 8 9 10 11 12 13 14 15 16 | next ]
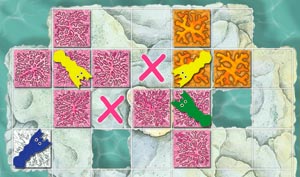
 Polyp tiles may be placed on any of the empty rock spaces where there is no polyp tile or shrimp (see following note) in order to start a new coral or expand an existing coral. The one exception is that a polyp cannot be placed in a space that would connect two corals of the same colour if both of those corals contain a shrimp (as the shrimps guard against this type of action). The diagram to the right illustrates this exception – a pink tile cannot be placed in the spaces marked by the pink X as doing so would join two guarded pink corals together.
Note: It is only a player's own shrimp that can be on a bare rock during that player's turn as a shrimp must always end a player's turn on a coral or behind a player's screen. If a player's creature is blocking the space where the player wants to place a polyp tile, then the player can simply move the shrimp, which they can do any time under action 5.
Polyp tiles can only expand a coral of the same colour. A coral is expanded by placing a polyp tile orthogonally (horizontally or vertically) next to an existing polyp tile. Polyps are not connected if they are only touching diagonally.
All the polyp tiles played as part of the same action need not form part of the same coral.
It is permissible for a polyp tile to be played so as to add to a coral that is protected by another player's shrimp. You may wish to do this for example in order to create a consumed polyp tile. (See consumed polyps.)
As previously stated, with the exception of action 5, a player must complete one action before starting another action. For the avoidance of doubt, a player who performs both actions 2 and 3 may not place any more tiles of the coral colour used in action 2 once they have played polyps of a second colour used in action 3.
Extra Growth
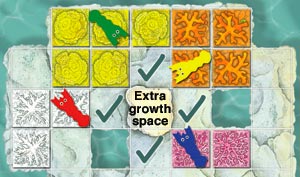
 Each rock contains a light coloured 'extra growth' space. Every time a polyp tile is placed orthogonally next to an empty free growth space, the coral will automatically and immediately (before any other tiles are placed) grow into the free growth space (the extra growth is not optional). Place a polyp tile of the correct colour taken from the side of the open-sea board onto the extra growth space. In the diagram at right, a polyp tile placed in any of the spaces ticked would generate extra growth in the brighter coloured central space.
The exception that a polyp tile cannot be placed in a space that would connect two corals of the same colour if both of the corals contain a shrimp still applies and in these circumstances there is no extra growth. (In the unlikely event that the correct colour of polyp tile is not available, then no extra polyp tile is laid). If the extra growth space becomes vacant again, then it will generate more extra growth next time a polyp tile is placed next to it.
An extra polyp tile received from a free growth space does not count toward the limit of four tiles that can be placed for each larva cube that is played.
Hints
In the first round it is possible for each player to play two larva cubes and consequently two types of polyp tiles. However playing a second type of polyp tile in the first round is not recommended as it is only possible to introduce one shrimp per turn. This means that one of the two corals the player has grown could not be protected and would therefore probably be claimed by another player using their shrimp. If you start to grow a coral two spaces away from another coral of the same colour, these corals cannot be joined if there are shrimps protecting both corals. Therefore both corals are protected from attack from the direction of that other coral. It is easier to protect a coral that is at the edge of a rock, as they are not so readily attacked. A player growing three to four different types of coral is more likely to get the types of polyp tile they require than a player trying to specialise in one or two types of coral only.
|